Hello Friends 👋,
Welcome To Infinitbility! ❤️
React Native detox tutorial
2. React native detox multiple typeText crash issues
3. React native detox with react navigation example
4. react-native-date-picker detox example
5. react-native-otp-input detox example
Today, we will learn how to do end-to-end testing in react native and for end to end testing we wil use Detox devlop by Wix.
This tutorial is part of React native detox series and in this first part, we will implement detox in react native application and write some test case examples.
Detox provides the option to test the application end to end ( E2E ).
End-to-end testing is a technique used to test whether the flow of an application right from start to finish is behaving as expected. The purpose of performing end-to-end testing is to identify system dependencies and to ensure that data integrity is maintained between various system components and systems.
Let start with setup a new application.
React native application setup
To create a new react native application you can use the following command.
npx react-native init ReactNativeDetoxExample
Clean your gradlew and check application running or not properly.
cd ReactNativeDetoxExample & cd android & gradlew clean
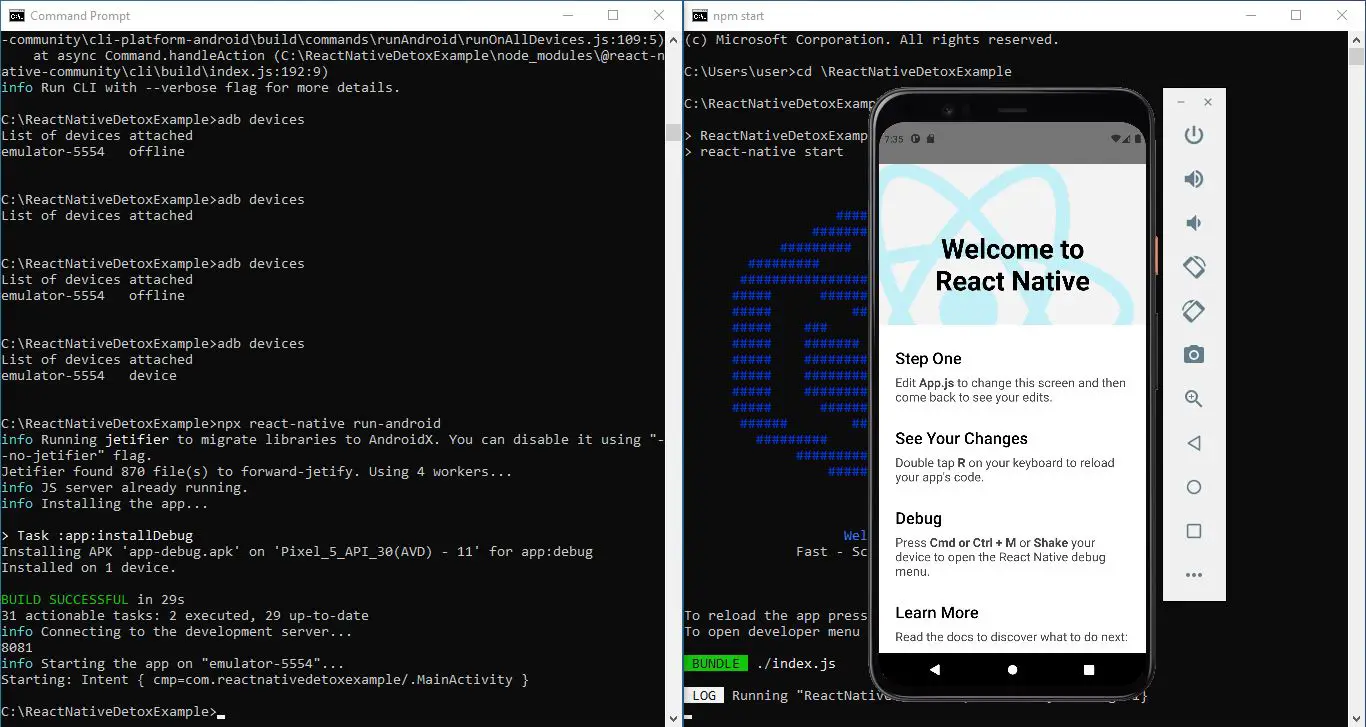
Run the application
cd .. & npx react-native run-android
Detox setup in react native
On our first step of detox set up, we install required packages to run detox.
Step 1: Install Detox
Install Detox CLI globally on your pc to run detox commands.
npm install -g detox-cli
Install detox package to your react native.
npm install detox --save-dev
Step 2: Gradle Files changes
Go to your project/android/app/build.gradle file.
-
Add following code lines to your android.defaultConfig
defaultConfig { testBuildType System.getProperty('testBuildType', 'debug') testInstrumentationRunner 'androidx.test.runner.AndroidJUnitRunner' } -
Add following to android.buildTypes.release
proguardFile "${rootProject.projectDir}/../node_modules/detox/android/detox/proguard-rules-app.pro" -
Add the following code lines to your dependencies section.
androidTestImplementation('com.wix:detox:+') { transitive = true } androidTestImplementation 'junit:junit:4.12' implementation "androidx.annotation:annotation:1.1.0" -
Go to your project/android/build.gradle and add the following code in allprojects -> repositories.
maven {
    // All of Detox' artifacts are provided via the npm module
    url "$rootDir/../node_modules/detox/Detox-android"
}
Step 3: Native changes for detox
Go to your project/android/app/src.
Create Folder androidTest/java/com/applicationname.
After create all above folder create DetoxTest.java file in androidTest/java/com/applicationname.
file-path looks like below example path.
project/android/app/src/androidTest/java/com/applicationname/DetoxTest.java
Add the following code in your DetoxTest.java file.
DetoxTest.java
package com.reactnativedetoxexample;

import com.wix.detox.Detox;

import org.junit.Rule;
import org.junit.Test;
import org.junit.runner.RunWith;

import androidx.test.ext.junit.runners.AndroidJUnit4;
import androidx.test.filters.LargeTest;
import androidx.test.rule.ActivityTestRule;

@RunWith(AndroidJUnit4.class)
@LargeTest
public class DetoxTest {

    @Rule
    public ActivityTestRule<MainActivity> mActivityRule = new ActivityTestRule<>(MainActivity.class, false, false);

    @Test
    public void runDetoxTests() {
        Detox.runTests(mActivityRule);
    }
}
Don’t forget to replace
package com.reactnativedetoxexamplewith your application name inDetoxTest.java.
Step 4: Jest Test runner setup for detox.
-
You have to use jest as a test runner for that you have to run the following command.
detox init -r jestThe output will look likes this if its runs perfectly.

React native jest output The above command will create init and configuration files in your ./src/e2e folder.
-
Then you have to add the following detox configurations inside your package.json file.
"detox": {
    "configurations": {
    "android.emu.debug": {
        "binaryPath": "android/app/build/outputs/apk/debug/app-debug.apk",
        "build": "cd android && ./gradlew assembleDebug assembleAndroidTest -DtestBuildType=debug && cd ..",
        "type": "android.emulator",
        "name": "Pixel_4_API_30"
    },
    "android.emu.release": {
        "binaryPath": "android/app/build/outputs/apk/release/app-release.apk",
        "build": "cd android && ./gradlew assembleRelease assembleAndroidTest -DtestBuildType=release && cd ..",
        "type": "android.emulator",
        "name": "Pixel_4_API_30"
    },
    "android.wallet.device": {
        "binaryPath": "android/app/build/outputs/apk/debug/app-debug.apk",
        "build": "cd android && ./gradlew assembleDebug assembleAndroidTest -DtestBuildType=debug && cd ..",
        "type": "android.attached",
        "name": "NOKIA2A"
    }
    },
    "test-runner": "jest"
}
Here I have added an android wallet device so you can use your own mobile devices to test your application.
I have used “name”: “NOKIA2A” and this is the example device Id of my mobile device.
- To know your real device name connect your device and open CMD and enter the following command it will show the connected device name.
adb devices- To know your emulator device name go to your AVD folder below mine PC path example
C:\Users\user\.android\avd.
Delete your ‘.detoxrc.json’ file because already set up on the package.json file.
Now your DETOX setup is done let create UI and test cases.
Write Detox test cases
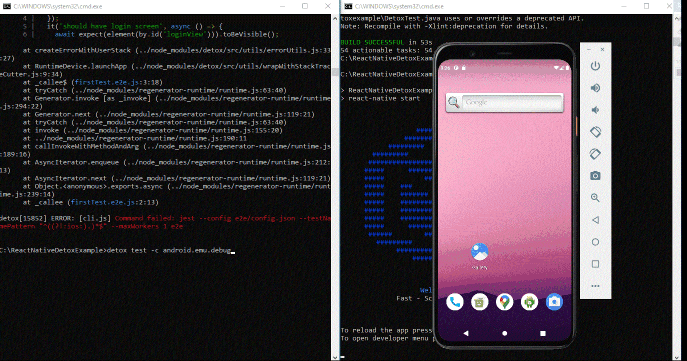
I have created a sample login page and now going to write test cases for it.
firstTest.e2e.js
describe('Example', () => {
  beforeAll(async () => {
    await device.launchApp();
  });
  it('should have login screen', async () => {
    await expect(element(by.id('loginView'))).toBeVisible();
  });
  it('should fill login form', async () => {
    await element(by.id('emailInput')).typeText('[email protected]');
    await element(by.id('passwordInput')).typeText('1234');
    await element(by.id('loginButton')).tap();
  });
});
Run Detox testcases
To run detox test cases we have to first build APK.
Run the following command in your project/android folder to build debug APK.
gradlew assembleDebug assembleAndroidTest -DtestBuildType=debug
Now, after successfully building APK.
Go to your project directory and start your metro bundler using npm start command.
Run following command test APK in emulator.
detox test -c android.emu.debug
Run following command test APK in real devices.
detox test --configuration=android.wallet.device
Thanks for reading …